The terms brick tuckpointing and repointing are often used interchangeably, however, there are different results and expectations when deciding which repair your chimney needs. If your chimney’s mortar joints are starting to crack and fail, then you can decide which repair is best for your chimney.
Most masonry chimneys are subject to years of harsh conditions, both from seasonal weather and serving your home’s fireplaces and gas appliances. Brick and mortar built chimneys should last a lifetime, but damp winters and corrosive exhaust, often damages the masonry joints of chimneys over time, both inside and out. If left in disrepair, damaged brickwork gets worse, which means you’ll have to rebuild your chimney.
Learn what causes joints to become damaged, and how to preserve your masonry chimney for years to come. Finally, find out how a mason repoints and tuckpoints brickwork, to keep your chimney healthy for a lifetime.

What is Tuckpointing
While most joint repairs are focused on restoration of damaged chimney parts, tuckpointing is performed as a decorative or cosmetic procedure. Tuck-pointing is the restoration of mortar joints to mimic very thin joints found in an older masonry design known as “Rubbed Brick”. This technique involves two different colors of joints.

Tuckpointing is a color matching mortar with a v-groove which simulates a thin joint between bricks.
First, mortar dyed to the color of the surrounding brick is applied, then, a thin contrasting mortar joint is placed to make the appearance of thin joints between the brickwork. This style of masonry was made popular in 18th Century England, as it simulated the more costly Rubbed Brick style, which was very popular at the time.
How to Tuck Point Brick Work
- Remove existing mortar between joints to a depth of 1-inch.
- Fill the empty joint with brick-colored mortar, flush with the outer surface of the bricks.
- Gouge a V-groove, more or less, in the middle of this dyed mortar joint and allow to partially set.
- Before the color mortar is completely set, apply the lighter “Lime Putty” mortar in a thin, uniform fashion, in the v-groove. This simulates a thin joint line, between the bricks.
Considering how both tuck- and re-pointing involve removing the existing mortar and applying new, is likely the cause of confusion between the terms.
What is Repointing?
When a masonry wall or chimney develops damaged joints, allowing moisture entry, it is recommended to remove the damaged portions and replace them with proper materials. This repair is known as “repointing”.
While joint repair blends in with the rest of the brickwork, it is considered more of a utility repair, with the goal of strengthening the wall and prevents water infiltration. “Re-pointing” is the most common type of brickwork repair and is a good option as long as the damage isn’t so advanced that bricks have started to crumble or become loose.
How to Repoint a Chimney
STEP 1: Removing the cracked old mortar joint first, to a depth of one inch, to no more than 1/3 the total depth of the brick. This will provide ample brick surface for our new mortar to bind to, without risking the chimney bricks coming loose.
Demo Tools:
- Drilling Hammer
- Assorted Cold Chisels
- 2’ paintbrush
- Safety Glasses
- Gloves
- Tarp to protect roof

STEP 2: Use a drilling or engineer’s hammer and different sized chisels for this demo work. Avoid harming the face of the brick by adjusting the size and angle of the chisel. Do not hammer directly into the chimney, rather tap in the direction of the joint, to encourage loose chunks to the surface. This will allow for a clean surface for the new joint to bond to, restoring the structure to its former strength.
STEP 3: Brush away any remaining dust and debris that may interfere with the pointing mortar placement.
STEP 4: Moisten the open joint with a damp paintbrush. This will add water to the surrounding surfaces and minimize the old masonry from “robbing” water from our mortar mix. Allow time for this moisture to soak in, as excess water in the joint will weaken the bond of the new mortar.
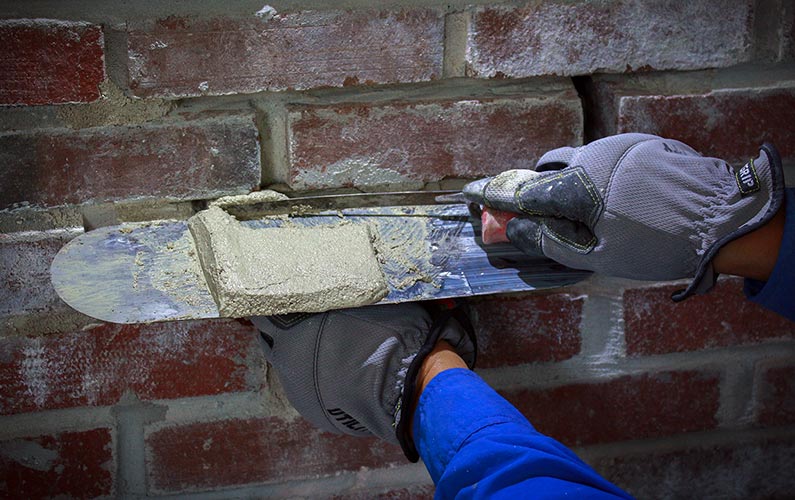
STEP 5: Using a Pointing Trowel and Hawk, trowel small portions of mortar mix into the gap, with only enough pressure to remove air cavities. Repeat with successive layers (or “Lifts”) until the joint is slightly overfilled.
Pointing Tools:
- Small mixing container
- Mortar Board
- Pointing Trowel
- Hawk or Float
- Brick Jointer
STEP 6: Once the joint is “green” (firm, but still can be dented with a thumb), dress the mortar with a Brick Jointer (sometimes referred to as a “Spoon”) to the shape and depth of surrounding masonry joints.
By taking your time, and using the proper tools and materials, your chimney may avoid additional damage, and put off additional repairs for decades.
Good Pointing Joints begin with a Good Mortar Mix
Mortar is a mixture of water, sand, and cement. But the type and amount of each ingredient will affect the appearance and longevity of our repair. The most common types of masonry cement are Type N and Type S, both types are used on chimneys with advantages and disadvantages. The thing to remember, when making repairs like tuckpointing and repointing is this…
Take care to repair masonry with the mortar type it was built with. Why? For example, Type S cement is very strong and rigid, and if used to point joints on an older brick chimney that was constructed of Type N, repointed joints will actually crack and break softer, older bricks.
Type N Cement has a modest strength and is somewhat flexible, but if used on a chimney built with Type S the result will be a soft, flimsy repaired portion of the chimney. Over time, issues will result where the flexible type N meets the rigid Type S.
Some may think sand is a filler material, but nothing could be further from the truth. It is the sand that bears the load of thousands of pounds of masonry from crushing our joints. Clean/washed sand is a must for pointing joints. Consideration should be given as well to the size of the sand granule. Generally speaking, the thicker your masonry joints, the larger the sand granule. Makes sense doesn’t it?
Why Does Mortar Fail?
Exterior masonry may become compromised due to the conditions it’s subject to, once put into service or poor original workmanship. Joint repair is part of a maintenance program on all kinds of masonry, not just chimneys. Since the joints are weaker than the surrounding bricks, it often needs attention sooner than the rest of the structure.
If the deterioration of the wall or chimney is extensive, then chimney rebuilding is often the only remedy. However, if cracked or crumbly mortar is addressed early on, then long-lasting repairs can be made. This is where Repointing and Tuckpointing may make the chimney strong again.

Freeze and Thaw
Chimneys appear to be solid structures, sturdy and unchangeable, but that isn’t quite true. Both the bricks and their joints have small air pockets that will fill with water during damp conditions. Rain and melting snow will soak a masonry structure and fill any cavities with moisture.
Damp masonry alone isn’t necessarily very damaging, however during freezing conditions, these water-filled chambers are damaged as the water turns to ice. This is because freezing water actually expands + %10, causing cracking of the brickwork. This damage starts out almost unnoticeable, but the small crack also holds water, and subsequent freezes turn small cracks into large ones. With Mortar joints, this freeze/thaw damage will often occur on the inside of the joint first, only showing visible damage years later, after the damage travels to the outside.
Corrosion Damage
Even top quality masonry, professionally installed, can suffer from the destructive damage of harsh chemicals over time. When chimneys were tasked for the venting of oil and coal burning appliances, they may suffer damage after a few years from the sulfides found in the exhaust.
Spalling of bricks and softening of the joints will be the result of exposure to these conditions. The clay flue liners also are prone to this damage as well, often resulting in the dangerous condition of the chimney becoming obstructed, causing a backup of exhaust and carbon monoxide in the home.
Even gas-fueled appliances (water heaters, furnaces) have byproducts of combustion and water vapor that will abuse the chimney, both inside the flue and exterior brickwork. Thanks to the frequent installation of Stainless Steel chimney liners, damage from exhaust has become far less frequent.
So, a common suggestion to customers with gas chimneys is… to protect your chimney from damage, consider installation of a Stainless Steel chimney liner kit.
Problems with Original Construction
Many times a chimney will need repointing or rebuilding due to damaged and missing joints that finally failed due to problems when the chimney was first built. For example, if the brickwork was allowed to freeze, while the mortar was still setting, it would have a premature failure. If the cement, sand, or water had contaminants present, the longevity of the work could be shortened. Finally, if the mortar was poorly mixed, with the wrong amount of water, cracking could show up as soon as the following day.
It is for this reason, we suggest, it’s in your best interest to insist on professionals to make masonry repairs on your chimney. After all, the most expensive repair is the one that is done twice.
Conclusion
Chimneys that are serviced annually and have repairs when the damage is just beginning, can last hundreds of years. By performing an annual inspection of your chimney and fireplace, you will be aware of potential problems with your masonry chimneys brickwork. And when needed, joint repair will minimize the damaging effects of moisture to the surrounding bricks and avoid the costly expense of having the chimney stack rebuilt. You’ll have the peace of mind knowing, your fireplace and chimney are ready to use when those chilly days of winter arrive.