The most important things to know when preparing wood for seasoning is how to stack firewood for seasoning and why you need to season wood in the first place.
Purchasing wood from a store or supplier doesn’t guarantee that it’s prepared or ready-to-burn.
Table of Contents
Well-seasoned wood logs are easier to burn and longer-lasting. Producing less creosote build-up and help your wood-burner systems operate at maximum efficiency with the lowest emissions. This post answers various Frequently Asked Questions people usually have regarding seasoning and stacking firewood. Including whether or not you need to cover your firewood and what options are available to get the job done right.
Before getting into the basics of stacking firewood, let’s talk cover some common questions surrounding WHY stacking helps the seasoning process for preparing logs.
FACT:
Dry, seasoned woods burn better and for a much longer time.
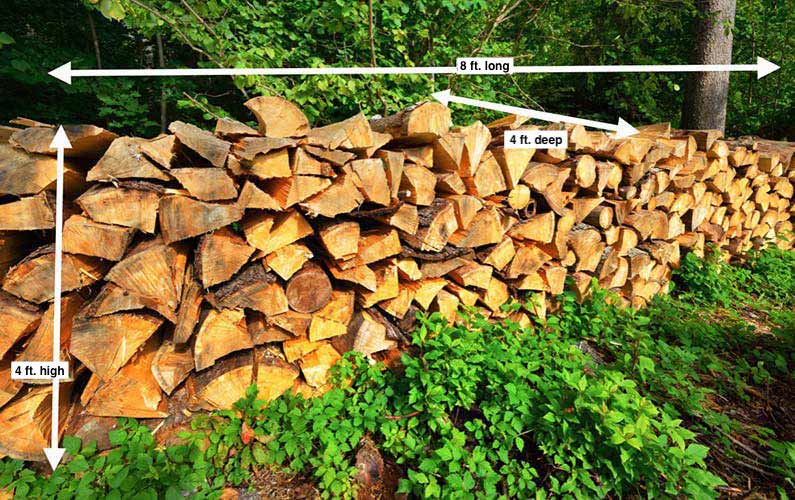
One cord of wood dimensions are 4 ft tall x 8 ft long x 4 ft deep
Learn About Stacking Wood
People often ask why stacking wood is important. The short answer is seasoning. But that’s just the tip of the iceberg! There are many more questions surrounding this topic. We’ll do our best to answer some of your most common questions here in this post.
The main reason to learn how to stack your firewood is to make sure it’s seasoned and ready to burn when you need it.
Whether you purchase a full-face cord or a half-face cord, (or even just small bundles or bushels from the store) you’re going to need an appropriate place to keep it.
We have answers regarding how to choose the right location for your woodpile. But first, let’s talk about WHY you should even bother seasoning wood in the first place. If you haven’t learned about moisture content in wood, then you might want to visit our resource page on how to choose the best wood before proceeding with this post that teaches you how to stack wood and how to season it.
Before you learn the how, let’s discover why firewood must be seasoned to burn.
Why Does Firewood Need Seasoned?
If your wood is not well-seasoned, then it isn’t easy to burn. Damp timber is hard to light and won’t stay lit for very long. The purpose of seasoning wood is to get better, cleaner-burning logs for your fireplace or wood-burner stoves.
Dry, seasoned wood burns longer.
The seasoning process takes time and serves the purpose of reducing the moisture content of your logs. A good location, sun, and circulating airflow is how to get good seasoned firewood within 1-2 years.
Video from CSIA – Chimney Safety Institute of America on how to save heat and money.
How long does it take to season firewood?
It can take 3-12 months or longer to season firewood. On average, it usually takes around 6-months to dry out the cut-firewood that you purchased from a store or supplier. Depending on the original timber’s moisture content, it can take more or less time to season.
Some factors that play a part in the cut wood-drying process:
- WHEN was the tree cut down?
- HOW was the cut-timber stored before purchase?
- WHERE do you keep cut-logs in your yard?
All these things play a role in how long the wood seasoning process takes from start to finish, and only the end result is within your control.
Whether your wood is split and stacked appropriately is the last step in the process and YOU have complete control over how it gets done!
Let’s learn how to stack some logs!
Where is the Best Place to Keep Wood?
Keep firewood outside. The best place for a woodpile is away from structures, like the side of your house or garage.
Make sure your firewood is a minimum of 5-feet out from the outer walls of your home helps ensure termites (or other pests) don’t move from the pile of logs into your home.
Think About It
On a chilly winter morning, you’ll want your ready-to-burn firewood in the most convenient place, so you can quickly grab a few logs to get that fire started. Nobody likes a cold hearth!
That’s why we recommend a 5-30 ft distance from your home for your outdoor wood-stacking efforts.
How to Select a Good Location for Your Log Pile
One of the most critical aspects of planning a backyard firewood project, such as building a new seasoning shed (or any standard mound), is finding the best location to start stacking logs.
The most suitable place to keep firewood is in an area away from walls and near windbreaks to maximize exposure to airflow and sunlight. Choose a location at least five but no more than thirty feet away. The reason we limit it to thirty feet is for convenience.
No matter which method you choose for stockpiling your timber, make sure to select the best location for your woodpile.
The best spot to keep a woodpile in your yard is in an area with:
- adequate sun exposure
- sufficient wind exposure
- at least 5-ft to 30-ft away from your house (or garage)
Having a 30-foot distance between the pile and any residence is your best pest prevention. While 30-feet is the ideal, you can get away with less. Just remember the reason you need a minimum of 5-feet between your wood stack and any building is to prevent pests, like termites or other insects and rodents, from getting inside your home.
Suggested Reading:
If you’re looking for storage alternatives, check out our previous article featuring 10 new ways to rack and stack your woodpile! Read More…
Should you keep your woodpile in the shade?
When it comes to drying wood, wind and sun are critical to the seasoning process. However, in certain circumstances putting a woodpile in the shade can work well. As long as there’s enough air flowing through to dry the logs, it’s okay to pile your wood in the shade. The problem is that shady spots usually increase moisture, which isn’t doing you, or your logs any favors!
An ideal area for your new neatly stacked woodpile is sunny, breezy, and lightly covered on top. Make sure your log stack receives both sun and wind to help with seasoning the firewood.
The bottom line is that any wood kept in a damp, shady part of the yard will take longer to dry. If there’s not enough wind, you may end up with wood rot or mold and mildew, which certainly won’t help you burn any good fires.
Suggested Reading:
Learn more about how to select good wood to burn. Compare Hard, Soft, and Green-woods. Read more…
What is the Best Way to Stack Firewood?
Stacking your freshly cut logs into single rows allows each piece of wood to dry out, which is critical in the firewood seasoning process. You can create cross-stacked rows using irregular-shaped logs. Organizing your woodpile with a cross-stack method helps fresh air circulate every time the wind blows.
You’ll want to organize your woodpile to maximize airflow for drying and keep your log stack nice and clean.
Helpful Tip:
When stacking wood, keep your split logs cut-end facing toward the wind to aid in faster drying times and more efficient seasoning.
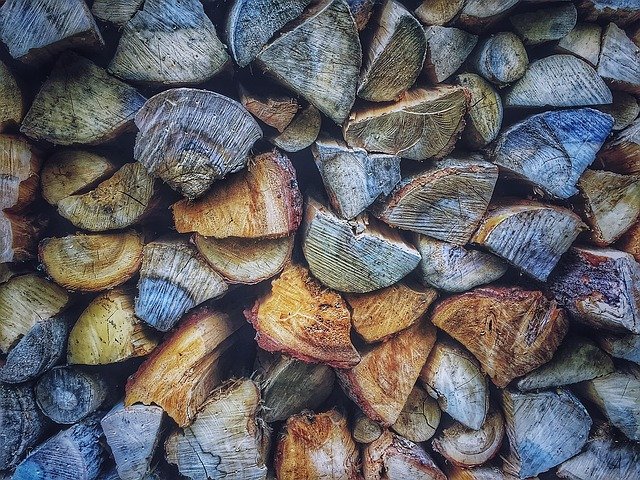
When stacking wood, keep your split logs cut-end facing toward the wind (as shown) to aid in faster drying times and more efficient seasoning. Try to leave more room for air between logs. Odd-shaped pieces help or stack crossways.
Cross-Stacking Wood is Best for Air Circulation
Wood dries best when stacked in single rows, alternating directions. Don’t stack it very high unless it’s supported by a fence or barn wall. If that isn’t possible build two or more tiers.
Allow as much air as possible to enter into your stack by using irregularities and odd-shaped logs to create cross-stack channels for open-air drying.
Always stack your split logs bark side up. Bark naturally helps keep rain and moisture out of the living tree and it will continue to shed moisture even on the woodpile.
Click to Open Video Transcript:
“My granddad used to say you could tell a lot about a person by their woodpile. So whether you cut it yourself or you buy it from a supplier you want to make sure your woodpile is organized in such a way that keeps it tidy and maximizes drying. Wood just thrown into a heap won’t dry well, so it won’t burn well. Rain will run down and soak into cut ends while ground moisture will migrate up and soak into spongy inner bark. But even the hardest wood will burn quickly and efficiently if it’s well seasoned. Give the wood as much sun as you would your garden. Wood stacked in moist shade will never dry. To encourage air movement through the stack, orient the wood so that the cut ends face west into the prevailing winds.”
Use a Fence for Support
To support the ends of your stacks you could either use a fence post or even a tree for freestanding stacks.
Build secure square log cribs by alternating courses of east-west Logs with north-south logs for added weather protection cover your pile securely with a tarp give your woodpile a little attention and not only will you earn the admiration and respect of your neighbors you’ll reap the rewards come winter with dry and clean-burning fuel.”
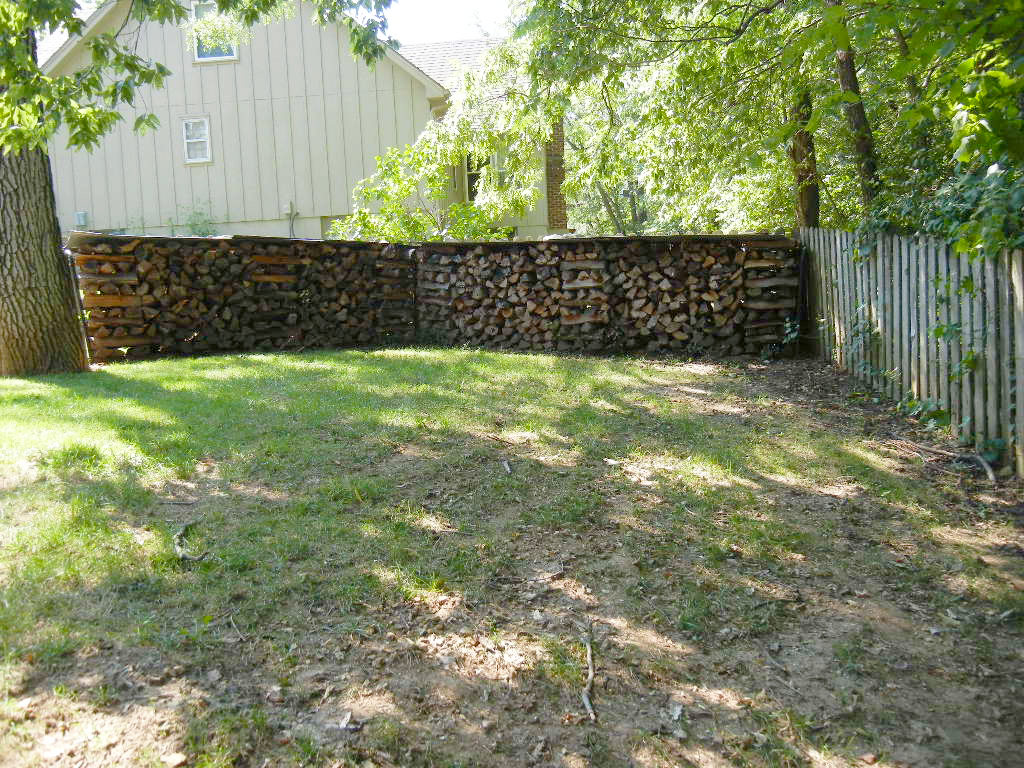
A nice example here in a local Kansas City residence of properly covered and cross-stacked firewood for seasoning in a backyard. Notice how it even has a little natural tree cover canopy above!
Where Should you Place a Wood Stack?
Look around your yard and choose the best location to maintain the mound. Stack your woodpile 5-30 feet from the house, but close enough where you can easily access a few logs when needed in cold weather conditions.
Keeping the pile under tree cover is an excellent natural option as long as your stacked heap remains exposed to adequate sunlight and proper ventilation on all sides. Always place the logs with the cut-edges facing the wind for the best way to season your wood.
Helpful Tip:
Stack wood low enough where the shortest person in your home can comfortably grab a log from the top of the heap.
Elevate Your Cut-Timber OFF the Ground
Do not stack firewood directly on the ground to prevent the logs from absorbing moisture. Keep split-wood elevated (off the ground) by using a pallet, rack, or blocks. Since you’re stacking logs vertically into the air, you’ll want to maintain the stability of the wood-mound to prevent any fall hazards (keep kids and pets safe).
Keep Clean Logs
Never burn pressed or treated or wood. Be cautious not to burn any chemically treated lumber when burning in a fireplace or stove.
If you spray pesticides near your log pile, always cover the heap to avoid overspray when doing yard work. You don’t want people or pets exposed to any toxic fumes during burning. Furthermore, any wood containing chemical solvents is more combustible than untreated wood, so burning any pressed or pre-treated types of boards/lumber can lead to a fire spreading outside your fireplace.
Should You Cover Your Firewood Outside?
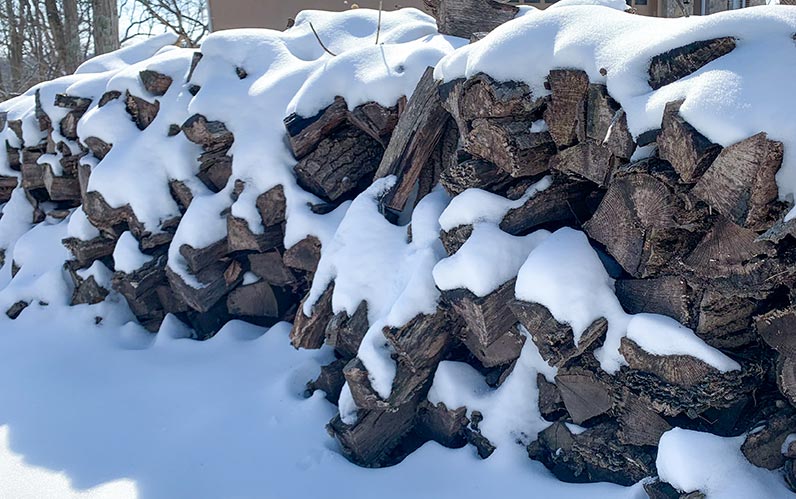
No, you should not completely cover your firewood in most situations. However, weather conditions such as heavy storms/rainwater, snow, and ice create the need to protect your firewood with a tarp or other store-bought covers.
For instance: Snow melting on these logs is NOT helping keep moisture out of your firewood!
We recommend a relaxed cover over the top to shed moisture away from your wood during seasoning. Some sort of overhanging top cover is often necessary to shed water away from the logs. Think of it like an open-styled roof covering for your wood.
The outdoor air must still be allowed to reach the sides of the stack to help keep your split-wood dry.
Remember the drying is the most critical step in the process of seasoning and preparing wood for burning in your fireplace (or outdoor fire-pits).
Think About It
What good is firewood that’s not suitable for burning? Damp logs are useless and not burnable.
Warning:
Never cover wood on all sides or seal it so tight that moisture gets trapped inside the pile, as doing so results in rotting wood (aka wood-rot), mold and mildew. Read more…
How Do You Know When Wood is Ready to Burn?
Take two wooden logs and hit them together. Listen to the sound it makes. Over time and experience, you’ll start to know what seasoned firewood sounds like and when it’s ready to burn.
Here’s a helpful video featuring Ashley Eldridge of the Chimney Safety Institute of America (CSIA) showing you how to tell when wood is ready to burn:
Recommended Video:
Want to know Why wet wood won’t burn?
Check out this helpful resource page full of information. Also, see our video about what happens when trying to burn lumber that’s still a bit too green.
Don’t forget to check out our YouTube Channel and Subscribe for more chimney, fireplace, and other firewood videos.
How to Cover a Woodpile?
One option won’t work for everyone’s yard, so it’s ultimately your choice.
Just remember your goal is drying and seasoning the wood. So whether you lean toward a natural cover or a store-bought variety, remember the purpose of covering wood is to help shed moisture away from your split logs and allow air to circulate, thereby assisting with drying the wood.
Different Types of Covers
There are the types of covers that slip over the wood, and then there are the full metal frames that come with a fabric cover that goes over the top. These are pretty nice and are among the most attractive option for covering lumber in your yard. Fabric covers usually have velcro, toggle-ties, or zippers to open and close as needed.
Some claim even to quicken the season process, like this one at ShelterLogic but we’ll let you be the judge of that.
Use What’s Naturally Available in Your Yard
There are natural ways to cover your firewood, such as choosing a location between two large trees that create a natural canopy cover to protect the mound. We love natural options! It’s a great way to allow the trees to provide shelter from the elements while also helping dry when the damp weather conditions subside.
Purchase a Modern Wood Cover
If the natural approach is not sufficient for your needs, and you want more than a tarp to cover your logs, there are plenty of other commercial options to choose from on the market. Many of them are surprisingly low cost for the amount of prepared timber they’ll cover.
Pricing Options for Covering Firewood
If you choose to cover your wood stack, then the cost and size of your cover will vary depending on the amount of wood you plan to store. Most residential consumers will not keep a full cord of wood on hand but may have a full face or a half-face cord to cover.
Both cheap fabric covers and high-dollar seasoning sheds are likely UV-treated fabric, and many claim to help you get burnable wood faster than allowing it to dry out naturally.
Wood Stack Covers with Price Estimates
Below you’ll find a chart that covers your estimated costs and considerations when choosing a cover for your wood stack.
Option 1: High-Cost but Affordable
Splurge for the ultimate in firewood seasoning sheds (which is another name for a firewood tent). Which will cost an average of $125-$600 or more depending on the amount of wood, size of frame, and style you choose. However, we found some on sale for as low as $79 so it’s possible to find a good deal!
The smallest options hold up to a ½-cord of wood, while the largest holds up to 7-cords! We’re guessing most seasoned wood burners will opt for the 10x10x8 ft model that holds as much as 3-½ cords.
Option 2: Low-Cost and Affordable
Weather-resistant polyethylene fabric covers are a good fit for the price-conscious consumer. Like what you’d use to cover a BBQ Grill, you can expect to replace it every 2-3 years due to normal wear and tear. These wood rack covers don’t come with a frame like the higher-end sheds.
The fabric simply slides over the top of your rack and protects the logs from rain and moisture. This type of cover may help protect from heavy rain or storms but be careful covering the entire stack and not allowing enough air to flow through.
Option 3: The Cheapest Cover Available
The cheapest option for covering wood is with a standard tarp made of Polyethylene plastic. Expect to pay roughly $10-$80 depending on the size needed, brand of choice, and your personal preference for tarp quality. By far the most popular option. Be prepared to need other supplies to keep the tarp down like bungee cords or blocks.
See this video where he uses ropes and two bricks as weights to hold down the tarp:
Watch as he covers with a plastic tarp using ropes and bricks as weights.
Option 4: Low Cost to Possibly Free (but not available to everyone)
Use any existing open roof structure already constructed on your property. This option obviously won’t work for everyone. If you do have access to an existing open-faced building (even better if it has a slanted roof) this may be your best bet! It could be easily converted to accommodate your new wood-stack. Price varies per situation but could essentially be free.
Another option is to build your own shed with or without a cover. Check out our recent post featuring 10 different DIY methods for making your own.
Option 5: The Natural Option and 100% FREE
The most natural option is to use mother nature’s canopy as your wood shelter. If you have mature trees in your yard, then this could be an option. This is a 100% natural and FREE way to cover your wood.
It may take much longer to season and risk wood-rotting issues, but to each their own.
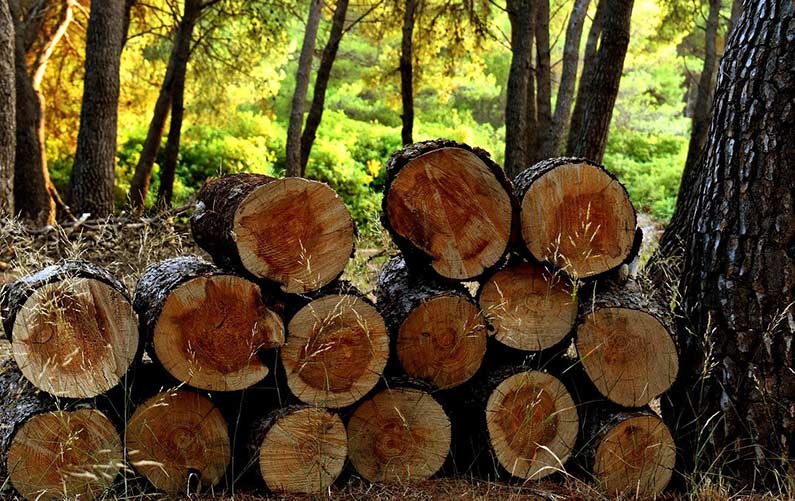
The bark on these logs may help protect from moisture but once split, do not let your wood touch the ground.
Use two existing mature trees to protect your woodpile. Using the trunks to hold the pile in place between the trees (like bookends) and allowing the branches, limbs, leaves as a natural shelter. Not to mention the wind helps with open airflow.
If this covering method works for you, then go for it!
Just make sure the logs don’t touch the ground, use bricks or pallets to elevate your pile once the woods been chopped and split.
No matter which type of cover you choose, rest assured in just a few months, your seasoned firewood is ready to enjoy!
Conclusion
Thanks so much for reading! We hope you’ve got the answers to your questions regarding your backyard firewood projects!
If you didn’t learn everything you needed to know about seasoning, stacking, and covering wood then not to worry we’ve got plenty more content. Check out some other posts below.
We’ll see you next time! Happy burning 🙂


